In the previous blog, I introduced how to configure hardware engineering under Vivado, instantiate SPI hardware interface, and how to use petalinux to load SPI bus driver provided by Xilinx. If you want to control external devices through SPI, you need to add SPI device driver. Implement the external control logic of SPI.
There are many peripheral device drivers in the driver/spi directory of the Linux kernel. This blog mainly introduces how to use the spidev and c device drivers to control the peripherals.
Spidev is a general-purpose SPI peripheral driver that provides registration for spi character drivers and provides an I/O control interface to upper-level applications. When we only need to use the SPI interface to send and receive simple control sequences to peripherals, The driver can be used directly. The specific usage is described below.
First, in the previous blog, we used xilinx to implement the registration of the SPI bus driver on the chip for the spi-cadence.c driver provided by the Zynq 7000 processor. Next, we need to modify the device tree file to connect our peripherals. Under the SPI bus.
In the petalinux project../subsystems/linux/configs/device-tree directory, find the device tree file related to zynq. The files contained in the directory are as shown below.
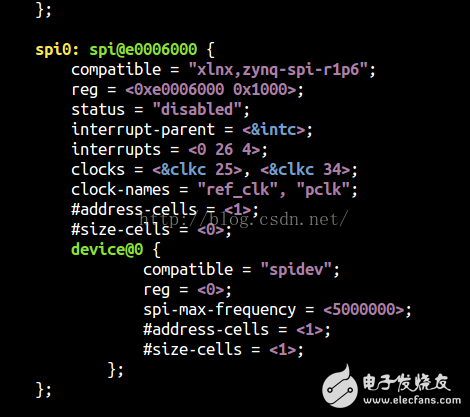
Open the zynq-7000.dtsi file and find the spi0 node (specifically use spi0 or spi1 according to the hardware project configuration), and add the following content under the node:

The "spidev" name corresponds to the driver name in the spidev.c file. When the Linux system starts, it will automatically find the corresponding driver module and load it.
Reg<0> corresponds to the first device under SPI. Since the SPI controller on the Zynq PS side can externally control 3 slave devices, the value of reg can be set to 0, 1, or 2.
As in the previous blog, the SPI interface spi0_csn_0_o was instantiated and exported from the Vivado hardware project, so the SPI enabled port 0 is used in this project.
At the same time, spidev.c does not support the chip select function. Therefore, if multiple slave devices are mounted under spi0, the spi0_csn_0 chip select interface in the hardware project is extracted, and the spiddev driver will be in /dev when registering. Register multiple devices in the directory, corresponding to the slave devices connected to each chip select interface.
After modifying the device tree file, use the petalinux-config -c kernel command. In the devices driver/spi support directory, select user mode SPI device driver support, then recompile the kernel and start the system. You can see it in the /dev directory. Registered as an SPI character device, generally named SPI xx.
To program the peripherals in the application layer, refer to the spi_test.c program in the /opt/petalinux-v2015.4-final/components/linux-kernel/xlnx-4.0/DocumentaTIon/spi directory.
Using this program, short-circuit the SPI's MOSI and MISO pins to self-receive data.
SHENZHEN CHONDEKUAI TECHNOLOGY CO.LTD , https://www.szsiheyi.com